Risk Management Process Overview
The Four-Step Risk Management Process
The WHS Regulations require PCBUs to manage risks using a systematic four-step process:
- Identify Hazards - Find what could cause harm
- Assess Risks - Determine likelihood and severity
- Control Risks - Implement controls following the hierarchy
- Maintain and Review - Monitor and review control effectiveness
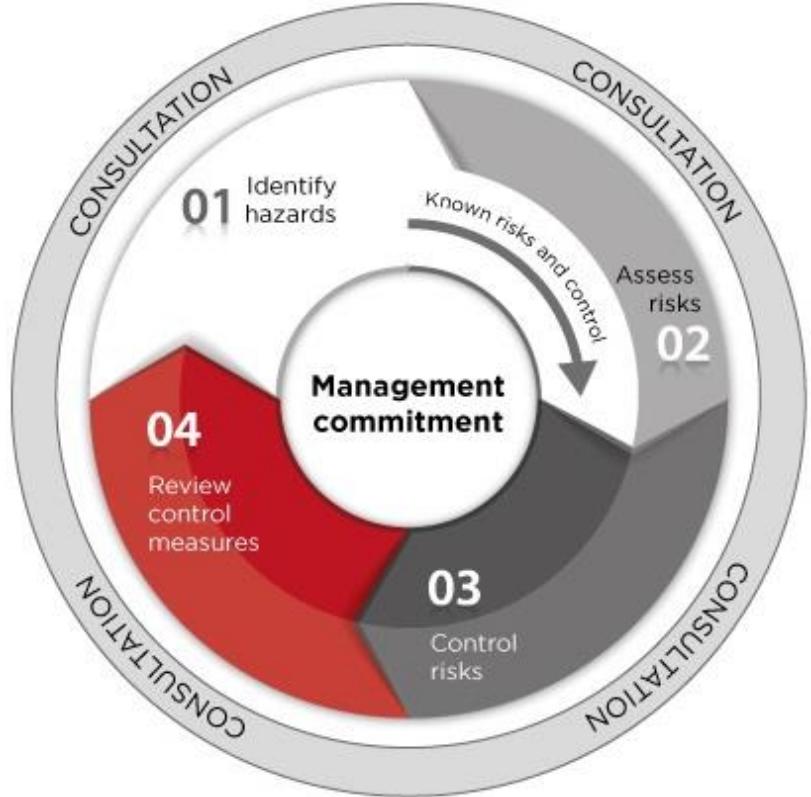
Risk management is not a one-time activity. It must be ongoing and reviewed when circumstances change.
Safe Work Australia's How to manage work health and safety risks provides the foundational guidance for this risk management process. It applies to all industries and forms the basis for the construction-specific guidance in this framework.
Step 1: Identify Hazards
A hazard is anything that has the potential to cause harm (injury, illness, or damage).
Common Construction Hazards
Physical hazards:
- Falls from heights (roofs, scaffolding, ladders, excavations)
- Moving plant and vehicles
- Electricity
- Noise
- Confined spaces
Chemical hazards:
- Silica dust from cutting/grinding
- Asbestos in existing structures
- Welding fumes
- Paints, adhesives, solvents
Manual handling hazards:
- Lifting heavy materials
- Repetitive tasks
- Awkward postures
Psychosocial hazards:
- Work pressure and deadlines
- Bullying and harassment
- Fatigue from long hours
How to Find Hazards
- Walk the workplace and observe work activities
- Talk to workers - they know the actual hazards
- Review records - incidents, injuries, near-misses
- Check manufacturer information - for plant and substances
- Consult codes of practice - for known hazards in your industry
- Monitor - health surveillance, air monitoring, noise monitoring
See Step 1: Identify Hazards for detailed guidance.
Step 2: Assess Risks
Risk is the possibility that harm might occur when exposed to a hazard.
Risk Assessment Considers
Likelihood: How probable is it that harm will occur?
- Certain/almost certain
- Likely
- Possible
- Unlikely
- Rare
Severity: How serious would the harm be?
- Death or permanent disability
- Serious injury requiring hospitalization
- Moderate injury requiring medical treatment
- Minor injury requiring first aid
- Negligible consequences
Exposure: How many people? How often? For how long?
When to Assess Risks
- Always identify and assess risks before starting work
- Higher priority for high-consequence hazards
- Detailed assessment where uncertainty exists about risks
- Quick assessment where risks are well-known and controls established
See Step 2: Assess Risks for detailed guidance.
Step 3: Control Risks
After assessing risks, implement controls following the hierarchy of control.
Hierarchy of Control

Level 1: Elimination (Most Effective)
- Remove the hazard entirely
- Example: Prefabricate at ground level instead of working at heights
Level 2: Minimise Risk
- Substitution - Replace with something less hazardous
- Example: Use water-based paint instead of solvent-based
- Isolation - Separate people from the hazard
- Example: Barricade work area to keep people away
- Engineering controls - Physical changes to reduce risk
- Example: Guardrails on scaffolding, ventilation for dust
Level 3: Administrative Controls and PPE (Least Effective)
- Administrative controls - Procedures and training
- Example: Safe work method statements, permits, supervision
- Personal protective equipment (PPE)
- Example: Hard hats, safety boots, respirators, hearing protection
Always use the highest level of control reasonably practicable. Lower levels only when higher levels are not reasonably practicable.
See Step 3: Control Risks for detailed guidance on each level.
Step 4: Maintain and Review
Controls must be maintained and reviewed to ensure they remain effective.
When to Review
- Regularly - scheduled reviews based on risk level
- Before changes - new equipment, processes, or work methods
- After incidents - following injuries, near-misses, or failures
- When consultation indicates - workers report controls not working
- When new information - new hazards identified or better controls available
What to Review
- Are controls still in place and working as designed?
- Are workers using controls correctly?
- Have new hazards been introduced?
- Are better controls now available?
- Do workers have concerns about controls?
See Step 4: Maintain and Review for detailed guidance.
Consultation Throughout Risk Management
Consult with workers at each step:
- Identifying hazards - Workers know the actual hazards they face
- Assessing risks - Workers understand likelihood and consequences
- Controlling risks - Workers can suggest practical controls
- Reviewing controls - Workers know if controls are working
Workers doing the job have the best knowledge of hazards and practical controls. Their input makes risk management more effective.
Reasonably Practicable
All risk management duties are qualified by "so far as is reasonably practicable."
What is Reasonably Practicable?
Weighing the risk against what is required to eliminate or minimize it, considering:
- Likelihood of the hazard/risk occurring
- Degree of harm that might result
- What you know (or ought to know) about the hazard, risk, and controls
- Availability and suitability of control measures
- Cost of controls (balanced against the risk)
The greater the risk, the more must be done to eliminate or minimize it. Cost alone is never a reason to not implement necessary controls.
High-Risk Construction Work
Certain construction work is classified as high-risk construction work requiring additional controls:
Safe Work Method Statements (SWMS) Required
SWMS must be prepared before commencing:
- Work at heights (> 2 metres risk of fall)
- Confined space entry
- Demolition
- Excavation (> 1.5 metres deep or risk of person falling in)
- Use of explosives
- Work near energized electrical installations
- Work on roads with traffic exposure
- Tilt-up and precast concrete work
- Diving work
- Work in or near water/other liquid (drowning risk)
- Work in underground shafts or tunnels
- Use of pressurized gas distribution mains
See Safe Work Method Statements for detailed requirements.
High-Risk Work Licences
Certain work requires workers to hold licences:
- Scaffolding (basic, intermediate, advanced)
- Rigging (basic, intermediate, advanced)
- Dogging
- Cranes (various classes)
- Forklifts
- Boom-type elevating work platforms (EWP)
- Pressure equipment
- Confined space entry (in some situations)
Risk Management for Specific Hazards
Detailed guidance for specific construction hazards:
- Construction Work
- Falls from Heights
- Excavation Work
- Confined Spaces
- Electrical Risks
- Plant and Equipment
- Hazardous Chemicals
- Asbestos
- Silica Dust
- Manual Handling
- Noise
Practical Application: Construction Site Example
Scenario: Constructing a two-storey commercial building
Step 1: Identify Hazards
Walk site and identify:
- Fall risks (slab edges, roof work, scaffolding)
- Plant risks (excavator, concrete trucks, cranes)
- Electrical risks (power tools, temporary wiring, nearby power lines)
- Manual handling (materials, formwork, reinforcement)
- Silica dust (concrete cutting/grinding)
- Noise (power tools, equipment)
Step 2: Assess Risks
Prioritize based on likelihood and severity:
- High risk: Falls from slab edges (likely, severe injury/death)
- High risk: Excavator striking underground services (possible, severe injury/death)
- Medium risk: Manual handling injuries (likely, moderate injury)
- Medium risk: Silica dust exposure (certain, serious long-term health effects)
Step 3: Control Risks
Apply hierarchy of control:
Falls from edges:
- Level 1: Prefabricate where possible to minimize work at heights
- Level 2: Install permanent edge protection (guardrails)
- Level 2: Provide scaffolding with edge protection for work areas
- Level 3: Fall arrest systems for areas where guardrails not practicable
- Level 3: SWMS for all work at heights
Excavator and services:
- Level 1: Relocate services before excavation (not practicable)
- Level 2: Locate and mark all services (Dial Before You Dig)
- Level 2: Hand dig within 500mm of located services
- Level 3: Competent excavator operator trained in service awareness
- Level 3: Spotter present during excavation near services
Silica dust:
- Level 1: Eliminate cutting where possible (order pre-cut materials)
- Level 2: Substitute lower-silica materials where possible
- Level 2: Water suppression and on-tool dust extraction
- Level 2: Isolate cutting work from other workers
- Level 3: Limit exposure time through work rotation
- Level 3: Fitted respirators when engineering controls inadequate
Step 4: Maintain and Review
- Daily: Check edge protection intact, water supply for dust suppression
- Weekly: Inspect scaffolding, test dust extraction equipment
- After incidents: Investigate and modify controls if needed
- Monthly: Review incident reports and worker feedback
- When changes occur: Reassess risks for new work methods or areas
Section Contents
- Step 1: Identify Hazards - Methods for finding workplace hazards
- Step 2: Assess Risks - Determining likelihood and severity
- Step 3: Control Risks - Hierarchy of control and implementation
- Step 4: Maintain and Review - Monitoring and review processes